
This guide explains how to connect QSO Director to GridTracker using UDP integration. By linking these applications, you can automatically transfer QSOs in real-time to GridTracker.
What You'll Acheive
By the end of this guide, you will:
- Automatically send logged QSOs to GridTracker
- Enable real-time data sharing between applications
Requirements
Before you begin, make sure you have:
- QSO Director installed and running
- GridTracker installed and configured
- Both applications running on the same computer (recommended)
Step 1: Enable Receiving of ADIF UDP in GridTracker
GridTracker communicates with external software (like QSO Director) using UDP messages.
- Open GridTracker
- Click the Settings icon
- Select the General tab
- Locate the Receive ADIF UDP box
- Ensure that Enabled is ticked
- Make a note of the Port number, the default in GridTracker is 2333 but this can be set to a different port
This allows GridTracker to receive QSO data from other applications in real time.
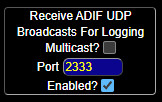
GridTracker ADIF UDP Settings
You can use alternative Port numbers to either avoid conflicts with other applications already using the default port. QSO Director does support GridTracker running on different ports and/or machines.
Step 2: Configure QSO Director
Now configure QSO Director to send it's QSOs to GridTracker.
- Open QSO Director
- Navigate to File → Settings
- Select the Realtime Network

- Click Add Sender
- A new Network Sender will appear
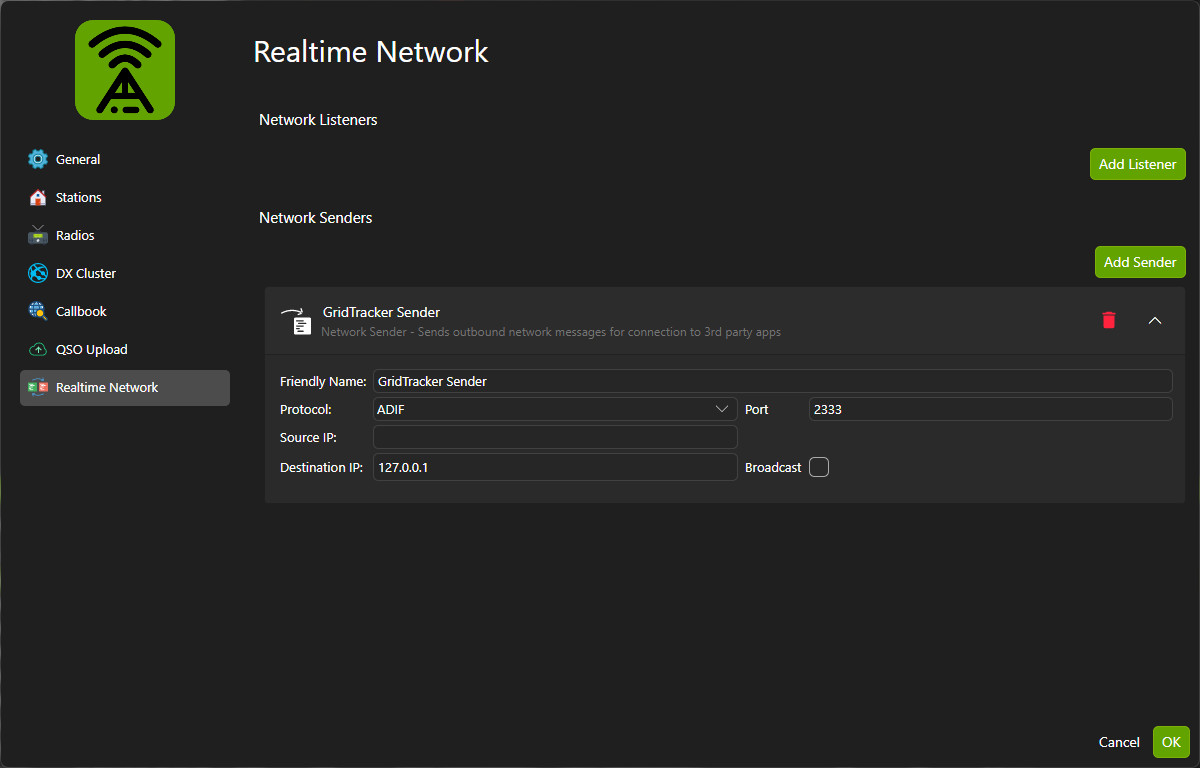
- Enter a Friendly Name:
- This is not critical for it's operation but provides a way for you to identify this network sender.
- Select the correct protocol:
- Protocol:
ADIF
- Protocol:
- Enter the same port that we note earlier from GridTracker:
- Port:
2333
- Port:
Optionally you can also configure the more advanced controls for the IP addresses to use and to send on. These are not neccesary if you are running GridTracker locally on the same machine as QSO Director
Source IP: Optional - If you only want QSO Director to send traffic from a specific IP Address you can enter it here. Leave blank unless you have a need for it.
Broadcast: Optional - If you only want to send data to all IP addresses on your network you can tick this. Leave blank unless you have a need for it.
Step 3: Test the connection
To confirm everything is working:
- Start GridTracker and QSO Director
- Log a QSO in QSO Director
- Check GridTracker:
- The contact should appear automatically in the GridTracker log
If successful, your systems are now fully connected.
Troubleshooting
If the connection isn’t working, check the following:
Common Issues
- Port mismatch
Ensure both apps use the same UDP port - Port Already in Use
Ensure no other applications are listening on the port you specified - Firewall blocking UDP traffic
Allow GridTracker and QSO Director through your firewall - Incorrect IP address
Use127.0.0.1for local setups - Multiple GridTracker instances
Ensure only one instance is using the configured port
Tips for Best Performance
- Keep both applications updated
- Use default ports unless you have conflicts
- Avoid running multiple logging apps on the same UDP port
- Test with a live QSO to confirm real-time logging
Connecting QSO Director to GridTracker is a quick setup that delivers major benefits:
- Automatic QSO logging
- Real-time data integration
- Improved workflow
Once configured, you can focus on making contacts instead of managing logs manually.